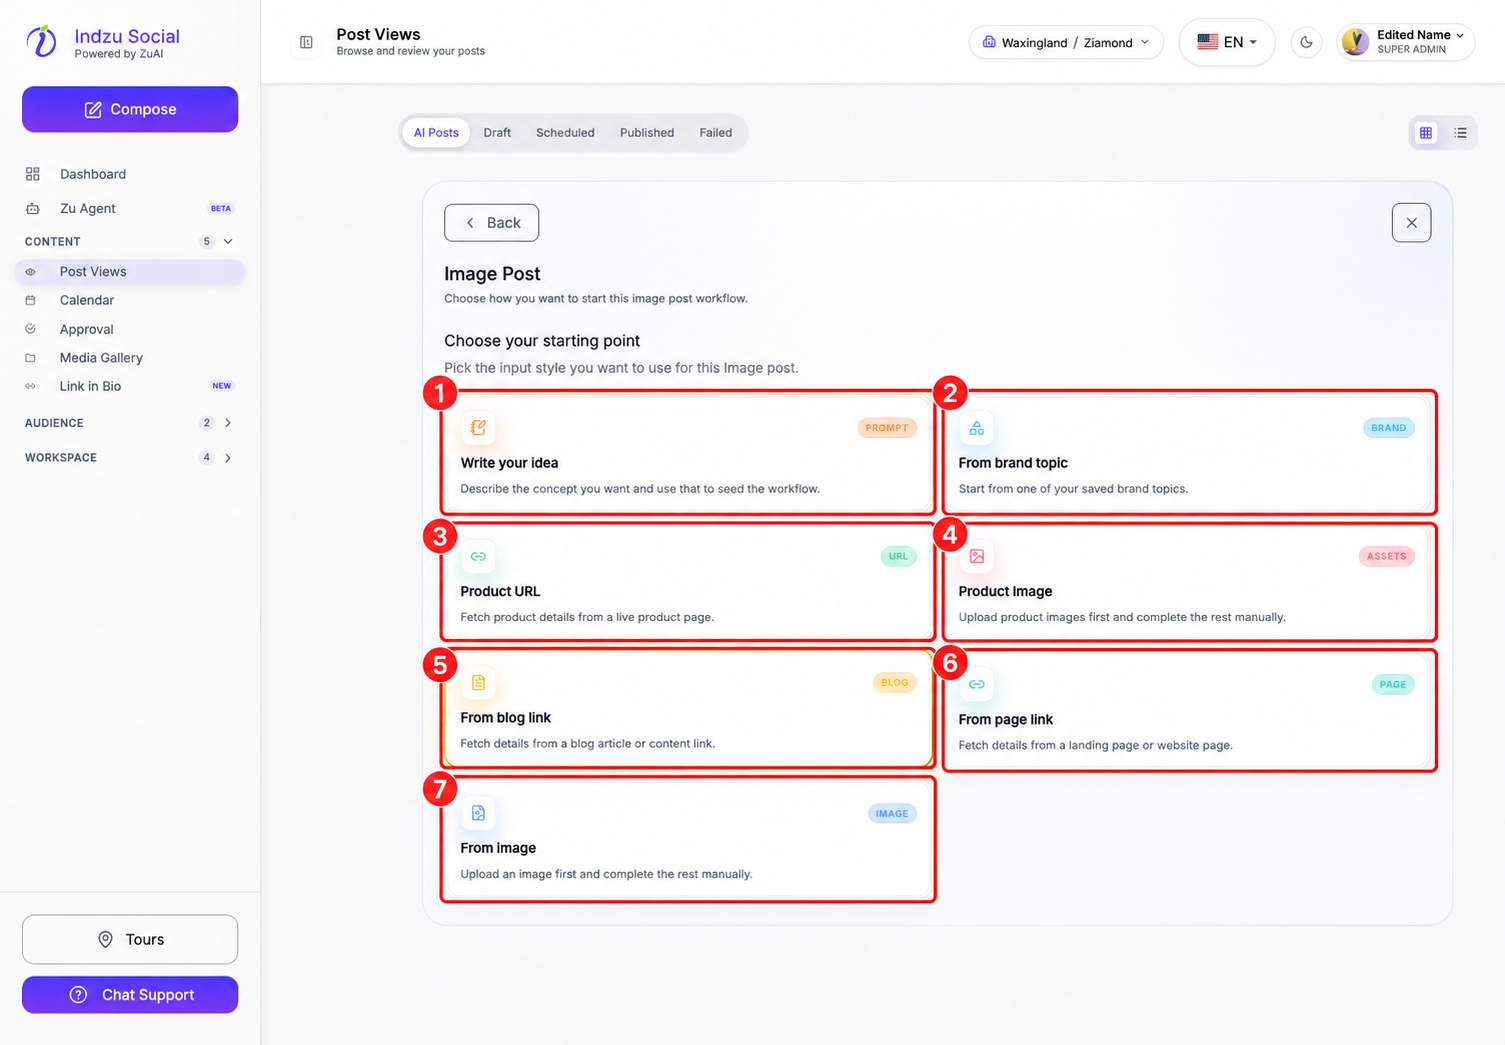
The Image Post workflow helps you create a single-image social media post using fetched product details and selected asset
Step 1: Click on “Image post”.

Step 2: There are 7 different input style from which you can create your image.

Let’s create image using 7 different input style of indzu.
1. Write your Idea
Step 1: Click on “Write your Idea”.

Step 2: Then you write your idea. Once done, the “Continue” button will turn blue.

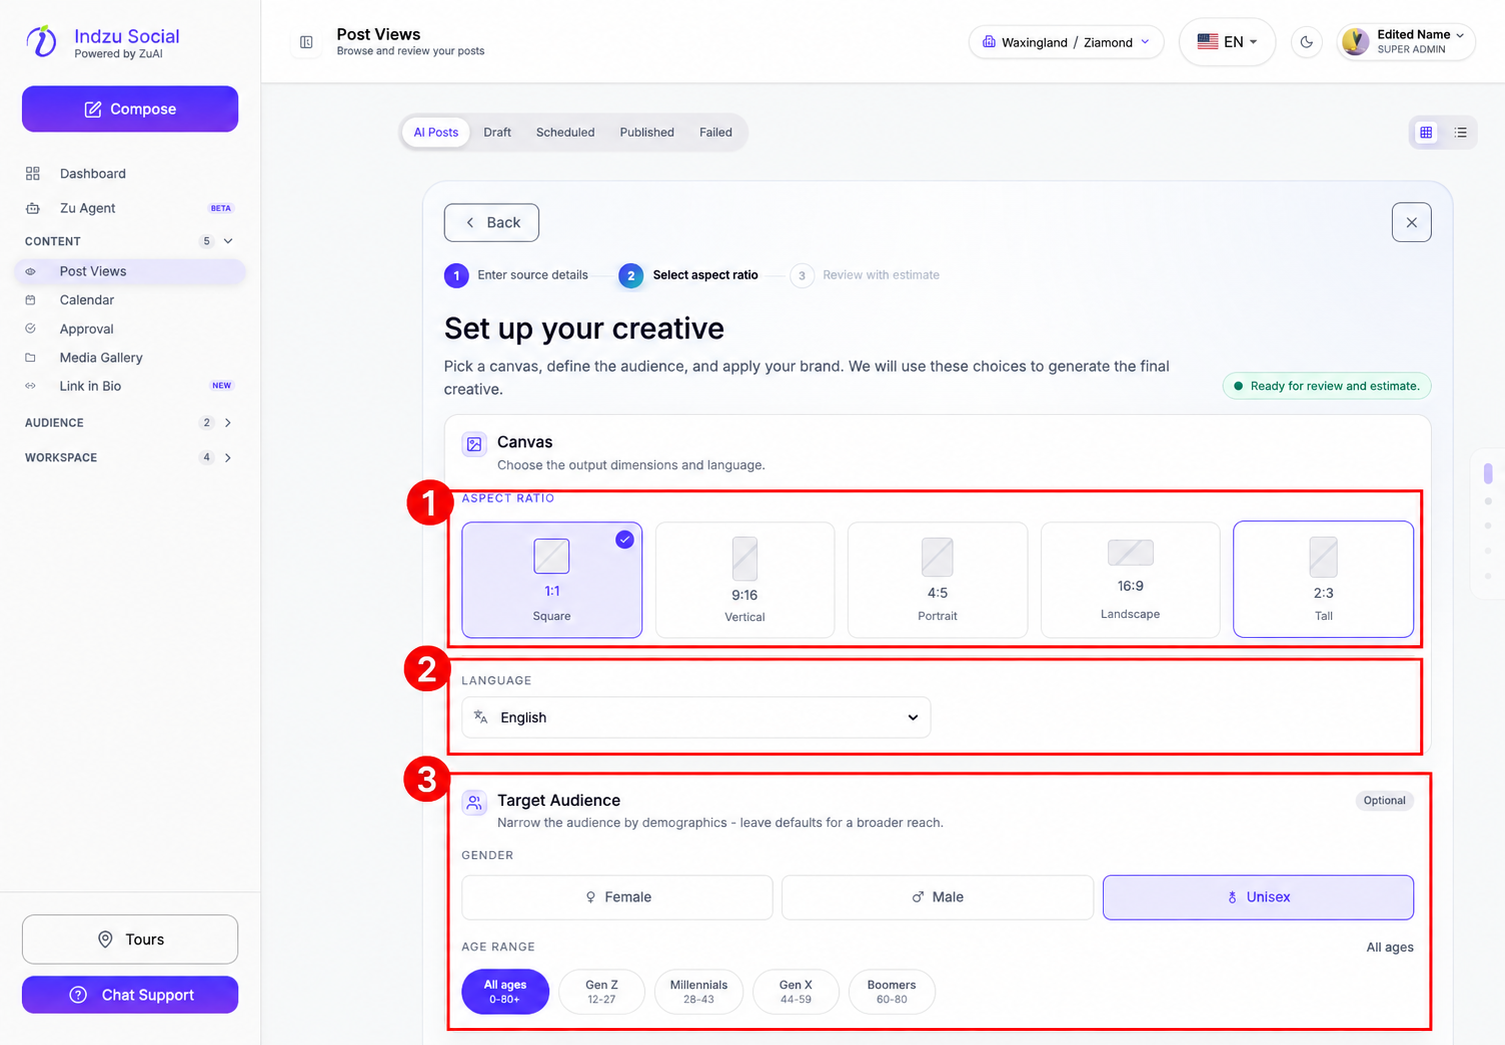
Step 3: Then you must set up your creativity by selecting the
- Canvas of your image,
- Preferred language,
- Your target audience.,
- Your brand details.
3.1 Select the aspect ratio you want to keep for your image.
Aspect ratio available
1:1 square
9:16 Vertical
4: 5 Portrait
16:9 Landscape
2 : 3 Tall

Step 4: Select your Language.

Step 5: Select your target audience.
5:1 Choose gender from
Male, Female, Unisex
5:2 Choose your age range you want to target
All ages 0 – 80+
Gen z 12- 27
Millennials 28 – 43
Gen x 44- 59
Boomers 60 – 80

Step 6: Select your Special Instructions.
Add specific details that you want in your post under ‘ special instructions ‘.

Step 7: Select your brand details.
Under brand details sections, ZU AI will automatically pull in the details that you entered earlier while creating the account. IF you want to adjust the primary color, secondary color and other brand details like the Industry, business email, phone, social handle, website, and post caption size, you can do it here.
7.1 Tap the “use brand” button next to brand details.
7.2 Once the button turns blue, edit the details.
7.3 Sometimes, you may need the post with logo and without logo. Turn on the include logo button at add your logo. If not, disable it.
7.4 Similarly, you can enable or disable contact details in the image. Turn on the include contact strip, if you want contact details, or else disable it.
7.5 Once all the details are entered, click “Review estimate”.
Step 8: Under Review estimate section, you can see the details like the
- number of credits consumed for the post,
- creative type,
- aspect ratio,
- the idea behind the post,
- target audience,
- total available credits, &
- credit score after the post creation.

Step 9: Then go to the “Review and estimate section”.
Step 10: Review your post description that you have selected before, see the credits that will be used then click” generate”.

When it is processing it will look something like this.

Then your post will appear.

2. From Brand topic
Step 1: Click on “From Brand Topic”.

Step 2: Select a brand topic from the list to provide and style of the post . Once you do that the “Continue” button will turn blue. Then click “Continue”.
Step 3: Then you must set up your creativity by selecting the
- Canvas of your image,
- Preferred language,
- Your target audience.,
- Your brand details.
3.1 Select the aspect ratio you want to keep for your image.
Aspect ratio available
1:1 square
9:16 Vertical
4: 5 Portrait
16:9 Landscape
2 : 3 Tall

Step 4: Select your Language.

Step 5: Select your target audience.

Step 6: Select Special Instructions.
Add details to the generated creatives. This is the section that provides specific information to ZU AI regarding the post.

Step 7: Select your brand details.
Under brand details sections, ZU AI will automatically pull in the details that you entered earlier while creating the account. IF you want to adjust the primary color, secondary color and other brand details like the Industry, business email, phone, social handle, website, and post caption size, you can do it here.
7.1 Tap the “use brand” button next to brand details.
7.2 Once the button turns blue, edit the details.
7.3 Sometimes, you may need the post with logo and without logo. Turn on the include logo button at add your logo. If not, disable it.
7.4 Similarly, you can enable or disable contact details in the image. Turn on the include contact strip, if you want contact details, or else disable it.
7.5 Once all the details are entered, click “Review estimate”.
Step 8: Under Review estimate section, you can see the details like the
- number of credits consumed for the post,
- creative type,
- aspect ratio,
- the idea behind the post,
- target audience,
- total available credits, &
- credit score after the post creation.

Step 9: Click Generate, once all the details are accepted.
Step 10: Your image will be generated within 60 seconds.

Step 11: You can check the post and schedule it for publication.

3. Product URL
Step 1: Click on “Product URL “.
Step 2: Enter the product URL. Click on “Fetch product details”. This section is a boon for e-commerce businesses and small scale businesses owning a website.
Step 3: Then the next page is “confirm your product details”. Check the title and product description. Enter the product price, offer price, promotional info.
Step 4: Then add special instructions and under assets select product picture. Click “continue”.
Step 5: Then you must set up your creativity by selecting the
- Canvas of your image
- Language
- The target audience.
- brand details
5.1 Select the aspect ratio you want to keep for your image.
Aspect ratio available
1:1 square
9:16 Vertical
4: 5 Portrait
16:9 Landscape
2 : 3 Tall

Step 4: Select your Language.

Step 5: Step 5: Select your target audience.
5:1 Choose gender from
Male, Female, Unisex
5:2 Choose your age range you want to target
All ages 0 – 80+
Gen z 12- 27
Millennials 28 – 43
Gen x 44- 59
Boomers 60 – 80

Step 6: Select your Special Instructions.

Step 7: Select your brand details.
Step 8: Then click on “Review estimate”.
Step 9: Then go to the “Review and estimate section”.
Step 10: Review your post description that you have selected before, see the credits that will be used then click” generate”.
Step 11: Then your post will be created.
4. For Product Image
Step1: Click on the “product Image”.
Step 2: Enter instructions, upload Product Images or from your media gallary. Click “Continue”.
Step 3: Confirm your product details. Enter the title, product description, price and special instructions. Then Click “ Continue”.
Step 4: Then you must set up your creativity by selecting the
- Canvas of your image,
- Preferred language,
- Your target audience.,
- Your brand details.
3.1 Select the aspect ratio you want to keep for your image.
Aspect ratio available
1:1 square
9:16 Vertical
4: 5 Portrait
16:9 Landscape
2 : 3 Tall

Step 5: Select your Language.

Step 6: Select your target audience.

Step 7: Select your Special Instructions.

Step 8: Select your brand details.
Step 9: Then click on “Review estimate”.

Step 10: Then go to the “Review and estimate section”.
Step 11: Review your post description that you have selected before, see the credits that will be used then click” generate”.
Step 12: Then your post will be created.
5. From Blog link
Step 1: Enter Blog link and special instructions. Then click “Continue”.
Step 2:
Then you must set up your creativity by selecting the
- Canvas of your image,
- Preferred language,
- Your target audience.,
- Your brand details.
3.1 Select the aspect ratio you want to keep for your image.
Aspect ratio available
1:1 square
9:16 Vertical
4: 5 Portrait
16:9 Landscape
2 : 3 Tall

Step 4: Select your Language.

Step 5: Select your target audience.

Step 6: Select your Special Instructions.

Step 7: Select your brand details.
Step 8: Then click on “Review estimate”.
Step 9: Then go to the “Review and estimate section”.
Step 10: Review your post description that you have selected before, see the credits that will be used then click” generate”.
Step 11: Then your post will be created.
6. From Page link
Step 1: Enter source details, enter page link and special instructions. Click “continue”.
Step 2: Then you must set up your creativity by selecting the
- Canvas of your image,
- Preferred language,
- Your target audience.,
- Your brand details.
3.1 Select the aspect ratio you want to keep for your image.
Aspect ratio available
1:1 square
9:16 Vertical
4: 5 Portrait
16:9 Landscape
2 : 3 Tall
Step 3: Select your Language.
Step 4: Select your target audience.
Step 6: Select your brand details.
Step 7: Then click on “Review estimate”.
Step 8 Then go to the “Review and estimate section”.
Step 9: Review your post description that you have selected before, see the credits that will be used then click” generate”.
Step 10: Then your post will be created.
7. From Image
Step 1: Upload your image from your computer file or from media gallary. Describe how the final creative should look or feel. Then click “Continue”.
Step 2: Then you must set up your creativity by selecting the
Canvas of your image,
Preferred language,
Your target audience.,
Your brand details.
Step 3: Select the aspect ratio you want to keep for your image.
Aspect ratio available
1:1 square
9:16 Vertical
4: 5 Portrait
16:9 Landscape
2 : 3 Tall
Step 4: Select your Language.
Step 5: Select your target audience.
Step 6: Select your Special Instructions.
Step 7: Select your brand details.
Step 8: Then click on “Review estimate”.
Step 9: Then go to the “Review and estimate section”.
Step 10: Review your post description that you have selected before, see the credits that will be used then click” generate”.
Step 11: Then your post will be created.
8. From Special and Ocassion Festival.
There is two option from where you can create your post .
- Select an occasion
- From idea
- Select an occasion
Step 1: Select your occasion on which you want to create your post, then click “continue”.
Step 2: Set up your creative.
Set the Canva ratio.
Select the language.
Variation count.
Target audience.
Special instructions.
Check the Brand details .
Click “review estimate”.
Step 3: Check the post review and credits. Then click “ generate”.
- From idea
Step 1: Write the festival name and description. Click “continue”.
Step 2: Set up your creative.
Set the Canva ratio.
Select the language.
Variation count.
Target audience.
Special instructions.
Check the Brand details .
Click “review estimate”.
Step 3: Check the post review and credits. Then click “ generate”.
9. Image AD creation
There are 5 type of input style.
- Idea
- Product Image
- Image to image
- Product URL
- Service URL
- Idea
Step 1: Write your idea, then click continue
Step 2 : Set up your creativity.
Step 3: Check the details in the review.
- Product Image
Step 1: Enter the product URL, then click “Fetch product details”.
Step 2: Check your product details. The product title, product description, price, offer price any special instructions. Then click “continue”.
Step 3: Set up your creativity then click “review estimate”.
Step 4: Check your details under review then click “generate” .
- Image to image
Step 1: Upload your image from you laptop file or our media gallary. Then click “continue”.
Step 2: Set up your creativity then click “review estimate”.
Step 3: Check your details under review then click “generate” .
- Product URL
Step 1: Enter your product URL. Then click “ Fetch product details”.
Step 2: Check your product details. The product title, product description, price, offer price any special instructions. Then click “continue”.
Step 3: Set up your creativity then click “review estimate”.
Step 4: Check your details under review then click “generate” .
- Service URL
Step 1: Add your service URL. Add special instructions. Then click “continue”.
Step 2: Set up your creativity then click “review estimate”.
Step 3: Check your details under review then click “generate” .
10. MEMES
There are 4 type of input style.
- Idea
- Brand Topic
- Service URL
- Blog URL
Idea
Step 1: Write your idea, meme template source, post style and then click “continue”.
Step 2: Set up your creativity then click “review estimate”.
Step 3: Check your details under review then click “generate”
Brand Topic
Step 1: Choose the topic from “Brand topic”, meme template source, post style and then click “continue”.
Step 2: Set up your creativity then click “review estimate”.
Step 3: Check your details under review then click “generate”
Service URL
Step 1: Enter your service URL, and add special instruction, meme template source, post style and then click “continue”.
Step 2: Set up your creativity then click “review estimate”.
Step 3: Check your details under review then click “generate”
Blog URL
Step 1: Enter your blog URL, and add special instruction meme template source, post style and then click “continue”.
Step 2: Set up your creativity then click “review estimate”.
Step 3: Check your details under review then click “generate”
11. Product Photo shoot
Step 1: Click on “product photo shoot”.
Step 2: Upload the image. Or enter product URL, click “Fetch product details”.
Step 3: Enter product name and description
Step 4: Set up your Canva and select the content generated type.
Step 5: Review and click “continue”.
Step 6: Then review and click “ generate”.